Tweaking Settings
We’ve created a simple image containing some text and have added a layer mask to it such that it looks something like this:

And we want this first operation to provide a slightly “washed out” feel to the base text. To do this, right-click anywhere on the canvas and go to Colors > Curves. You’ll want to adjust the color curves so that they look something like this:
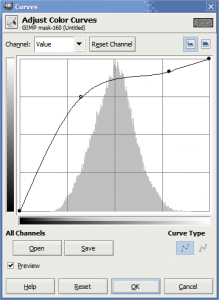
Click OK. Your text will look something like this:

At this point, it’ll look quite a lot like the original image we started with. That’s okay–we don’t want to overdo anything at this point. However, we do need to start cutting out parts of the text to give it a weathered look. But first, right-click on the current text layer and click Apply Layer Mask:
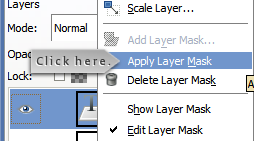
Also, it might be a good idea to make a backup of this layer while we’re at an early phase. Here’s a hint: We’ll be needing it layer. Go ahead and right-click the text layer and choose Duplicate Layer:
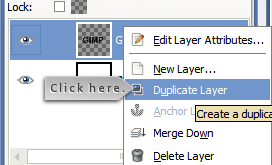
Make sure to hide the old layer, too, by clicking the eye icon to the right. Your layer dialog should now look something like this:
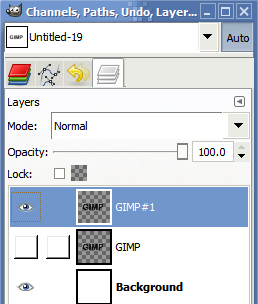
From here on out, we’ll be adding a bunch more layer masks to help us get the job done. To do this, click on the visible layer (not the one we duplicated and hid) and click Add Layer Mask. We also need to re-run the solid noise filter. You can do a couple of things here: ctrl+f will run the filter with the exact same settings as before, right-clicking on the canvas and going to Filters > Repeat “Solid Noise” will do the same thing as ctrl+f, or we can go back to Filters > Render > Clouds > Solid Noise. At this phase, I’d recommend following the last step; if you go back through the menus, you can change the random seed the clouds plugin is using. This is a good thing, because skipping this step will simply place holes in precisely the same parts of the image we set up with a slight transparency.
Once you run the Solid Noise plugin again, you should wind up with an image that looks similar to this:
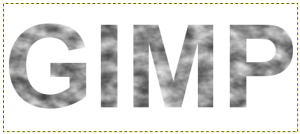
This time, we’re going to do something a little different. Right-click anywhere on the canvas and go to Colors > Brightness and Contrast. Adjust the settings of this dialog until you get something similar to this:
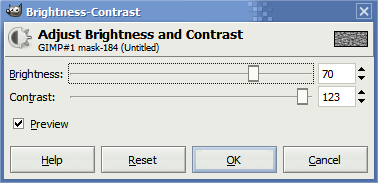
Your text should now look something like the following:

Getting closer, huh? Oh, and make sure to right-click your layer and click Apply Layer Mask. We’ll need to do that after every step.


2 Responses to “Scratched/Worn Text Tutorial in the GIMP”
Wow that’s a lot of screenshots!
Thanks for the step-by-step, Ben! That tutorial makes for a very cool text effect!
Yeah, I think I went a little overboard. All told I think I finished with 56 screenshots of the actual work. Thankfully, I was able to trim it down significantly.
Leave a comment