Pages: 1 2
No doubt you’ve seen the Windows Vista and Windows 7 backdrops. Chances are, you’ve also wanted a fast (and cheap) way of putting something together that looks pretty similar to the originals. Plus, it makes for a great way to break up a rather blank looking background!
As it turns out, there’s a really easy way to do it. Best of all? It’s cheap. Here’s a sample that I made using the GiMP–a free, open source image manipulation program–and it looks pretty sweet:
First Thing’s First
Obviously, you’ll need GiMP, although you can adapt most of these instructions to the image editor of your choice. In fact, that’s how I came up with this technique! If you’re curious, I found a tutorial that accomplishes approximately the same thing in Adobe Photoshop. But, we’re fans of open source, so there’s gotta be a cheap way of doing it, right? And we’re not doing a “holy light from the sky” effect, either.
These instructions were also written using GiMP 2.4.5. You can achieve this nifty effect on just about any version of the GiMP, though 2.6.x has moved a few things around. I also prefer the user interface of 2.4.5. What can I say? I’m biased.
Getting Started
First, we need an image to manipulate. Let’s create one. I chose a size of 1280×1024, although anything else will work. Just remember: We’ll be using the “flame” plugin to generate a slew of semi-random pixel patterns that’ll be stretched out for our light curtains. This means that the bigger your base image, the longer it’s going to take. Click on File -> New and set your image up similar to this:
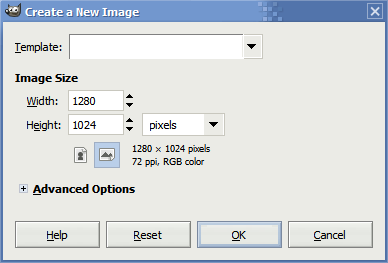
Figure 1: Create a new image.
Now you should have a new blank image. I chose black as my background color. If you need to fill your background in, you have a couple of options. First, you could select your background color before you create the new image by choosing black as your background:
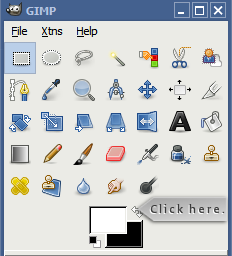
Figure 2: Swap background color to black.
Click the double-headed arrow to swap colors…
…or simply go to Edit -> Fill with BG Color (or FG color, depending one which is black):
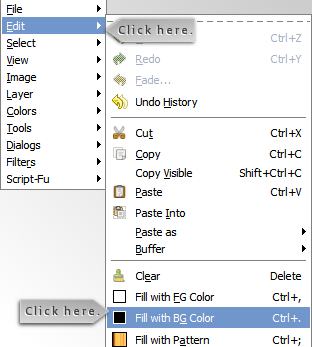
Figure 3: Fill with foreground/background color.
Now we’re ready to begin some real work.
Setting up Some Layers
We’ll need another layer to inject the base patterns we’ll be using to make the light curtains. It isn’t terribly important how the patterns come out so long as we have them, but it is important that we put them in a transparent layer. To do this, click on the new layer button:

Figure 4: Click the “new layer” button on the Channels, Paths, Undo, Layers window.
Then create a new transparent layer:
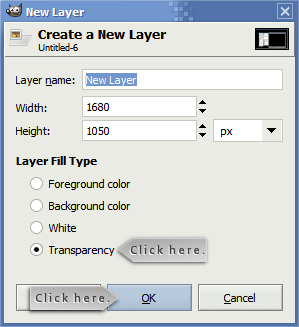
Figure 5: Create the new layer.
Once we have a transparent layer in place, we’ll create a flame. In GiMP, the flame plugin is simply a recursive fractal generator. It’s nothing super-fancy, and I’m certain other image editing suites have something comparable. If not, you have another excuse to download GiMP! (See that shameless plug I did there?) To create a flame, simply right-click anywhere on the canvas and go to Filters -> Render -> Nature -> Flame:

Figure 6: Open the “flame” dialog by clicking Filters -> Render -> Nature -> Flame.
This will bring up a new dialog box for us to play around with for creating a flame.
At this point, it isn’t important to get your flame output looking exactly like mine. Just get it close! There are a few steps which I have highlighted with a couple of “click here” arrows. I’ll get around to putting numbers next to them so you know what order to click in, but I think my instructions should suffice. Be careful on this part!
Methods that may work include the “plasma” and “noise” plugins, or you can take a picture with your favorite colors and use it as the source!
First, you’ll want to click on edit:
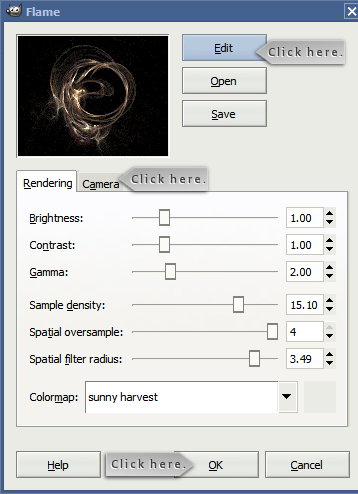
Figure 7: The main flame dialog. You can change the filter settings, number of samples, “camera” position, and even edit the flame itself here. You’ll want to click on “edit” first, though.
Then click one any of the eight outer boxes, such as where my arrow is pointing in this dialog:
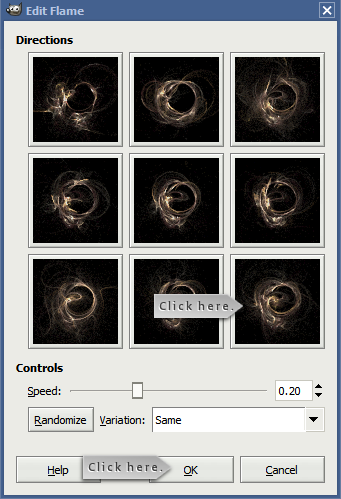
Figure 8: You can change the properties of the flame from here.
The central box is the one that the flame will currently look like if you click the OK button. The others show you permutations that will be applied to the flame if you click them. However, when you click the surrounding boxes, the new flame will be displayed in the central box and you can’t go back!
Play around with this section for a little while and try aiming for a circular flame like mine. If it doesn’t work, change the speed slider around, click the randomize button, or change the variation field to random. Once you’re done, click okay.
Now, take a look at the original dialog (not the one right above here–you’ll want figure 7). See the arrow pointing to “camera?” You’ll need to click that. I didn’t take a screen shot of this particular tab, because you don’t need to change much–just the zoom. Dragging the zoom slider to the right zooms in, and dragging it to the left zooms out. As you may have expected, we’ll want to zoom in so the flame takes up most of the image. Don’t zoom in too far, otherwise we’ll have a little too much color spread. Once you’re finished, you should have something that looks a little like this:
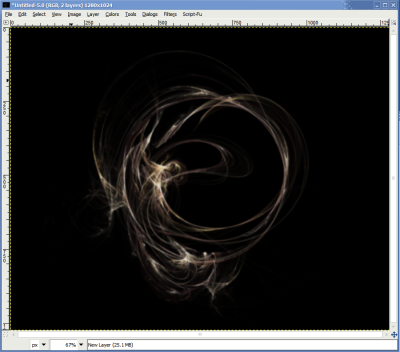
Figure 9: The finished flame.
Don’t worry about the colors, they need to be bright and we’ll fix them in a few steps. If the colors aren’t exactly right, go back to figure 7 and change the colormap to sunny harvest. It’s a nice, bright colormap, and it’s perfect for what we’re going to do.
If you’ve gotten this far, you’re going to have a couple of layers, and you might be curious why I said this section was Setting up Some Layers. There’s a reason–there’s always a reason–and here’s why: We need to create some duplicates. I’m sure you know how it goes. All it takes are a couple of misclicks, a few crashes, and sooner or later all the work you’ve put into a particular image is gone. So, let’s take some time to create a duplicate (or two) of our work. To do this, just right click on the transparent layer we created in figure 4 and click on duplicate layer like so:
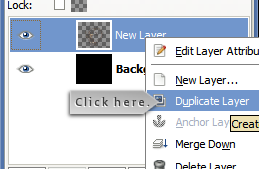
Figure 10: Duplicate layer.
It might be a good idea to create at least one more duplicate layer, but make sure to hide any duplicates. You can hide individual layers by clicking on the “eye” icon next to the layer in question.
So now we have a couple of layers, a strange fractal flame that looks nothing like what we’re going to end up with, and just a few more steps. The next page of this tutorial will show you how to take a semi-random blob of pixels and turn it into an amazing light curtain. Be aware that this next part is pretty image intensive, so it might take some time to load. Be patient! (If you happen to have a nice fat pipe to the Interwebs and would like to host this tutorial, feel free to let me know in the comments, but make sure to ask first!)
Pages: 1 2


Leave a comment